Tuesday, July 31, 2012

Fruit Tartlets

I made some fruit tartlets today for my husband to share with his colleagues as it is his last day of internship. I am really pleased with the results, considering that this is my first time making them. 

The tart shells and pastry cream were made yesterday and the assembling (filling with cream and fruit toppings) were done this morning. I love this type of recipe where the preparation can be done over several days, thus making it less stressful and tiring for the baker!

To prevent the shell from turning soggy too quickly, I lined the inner bottom and sides of the crust with a thin layer of melted chocolate. They were then left to dry for a couple of minutes in the fridge before filling up with the pastry cream. 

Fruit tarts are best consumed within the day once they are assembled. 


Recipe 
(for the shell - makes about 8)
125g All-purpose flour
75g sugar
60g unsalted butter, bring to room temperature
1 egg yolk
1/2 tsp vanilla essence
a pinch of salt

Directions
1. Beat butter and sugar in a mixing bowl till light and fluffy. 
2. Add in vanilla essence, egg yolk and salt. Mix well. 
3. Sift flour into the above mixture and incorporate well. 
4. Form into a ball and refrigerate for 30mins. 
5. Pre-heat oven to 180 deg Celcius. 
5. Roll out the dough into desired thickness and shape into tart tins. Refrigerate again for 10mins. 
6. Prick the bottom of the tart shells with a fork (to minimize bottom from bulging during baking process). Bake for 15mins or until shells turn a light golden brown. 
7. When done, let it cool in the tin for 15 mins then remove and continue cooling on wire rack. Store in airtight container till ready to use. 


(for the pastry cream - recipe adapted from thelittleteochew)
2 egg yolks
55g sugar
1/8 tsp vanilla essence
2 tbsp cornflour
1/2 tsp unsalted butter
a pinch of salt

Directions
1. Whisk together egg yolks, 1/4 cup milk (60ml), sugar and vanilla beans. Mix in cornflour and salt (if using).
2. Bring the remaining milk to a scald* in a saucepan. Pour the hot milk in small stream into the egg mixture, whisking constantly with a balloon whisk as you pour (very important). Once incorporated, pour everything back into the saucepan.
* To scald is to heat to just below the boiling point.
3. Whisk the mixture over medium heat until it thickens and firms up. Remove from heat and whisk in butter.
4. Pour the hot custard into a bowl and plunge the bottom of the bowl into another larger bowl of iced-water to cool, give it a whisk occasionally. 

5. Once it reaches room temperature, scoop the crème pâtissière into a piping bag (twist the open end to seal up the custard) or into a ketchup bottle. Keep in the refrigerator until ready to use.

Monday, July 23, 2012

Chinese beef stew with radish

Recently, we had a hotpot lunch at a friend's place and two of the ingredients available (amongst many others) were beancurd sticks and beef tripe. It was our first time having these two ingredients in a hotpot and we enjoyed so much that we went to the oriental store to get some for our second round of hotpot at home.

With these two ingredients, I was inspired to cook a chinese style beef stew with radish, commonly found in noodle stores in HK. 


Ingredients
- beef chuck, cut into cubes
- beef tripe (百頁) sliced 
- 2 pcs Beancurd sticks, softened in water and cut into 2in pieces
- radish, cut into thick rounds, about 10pcs
- a few slices of ginger
- 1 tbsp oyster sauce
- 1 tbsp soy sauce
- 1 tbsp size rock sugar
- 2 tbsp soy bean paste
- 1/4cup Shaoxing wine
- 1 cup beef stock 
- 1/2 cup water
- baby bokchoy to garnish


Directions
1. Par-boil beef chuck in a pot of boiling water to remove scum and blood. Remove from pot and rinse with water. 
2. In a hot pan, add a bit of oil and saute ginger till aromatic then add in beef chuck. Brown all sides and add in all the seasoning. 
3. Make sure liquid is just covering the meat. Let it come to a boil then lower heat and simmer for 45 mins. 
4. Add in radish and simmer for another 30mins. Lastly, add in beancurd sticks and beef tripe and cook for 10mins. Beef chuck should be very tender by now. Turn off the fire and leave pot covered for 1 hour so that the beancurd sticks and tripe can absorb the aromatic gravy. Serve with rice and baby bokchoy on the sides. 


Saturday, July 21, 2012

Joey


Joey is a Yorkshire terrier and he belongs to our Pastor and his family. Knowing that we are dog lovers, our Pastor asked if we are able to take care of Joey while he and his family go on a short holiday. We jumped at the opportunity as we have met Joey before and knows that he is very cute.

Joey has been at our home since Thursday. He will be staying with us for about a week. Here are some photos showing how he has been enjoying his doggy vacation!

Hi! I'm Joey.. you can call me JoJo


It's nice to just laze around ... i love holidays!

Here's a short video showing Joey playing with us last night. The funny thing was that he was sleeping the whole day and only started becoming active at 10pm! Joey is a late night owl it seems.


Friday, July 20, 2012

Japanese Chiffon Cheesecake

I am really enjoying my new found interest in baking following my macaron making experience.

Recently,  I tried a recipe I found online for Japanese Cheesecake. I usually do not like cheesecake as I find it too dense and rich. However, Japanese cheesecake is very light as the amount of cream cheese used is significantly lesser. I can easily have two slices at one go without feeling sick. I've made it three times and it turned out successful everytime - no cracked surface and very fine texture.

Japanese Chiffon Cheesecake


Saturday, July 14, 2012

Macarons

Over the last few days, I have been experimenting with making macarons. I've only ate them once or twice and like how they come in various colors.

From what I read about macarons online, these French cookies are not easy to make. However, once the technique is mastered, it is actually very easy. The most difficult part is getting the right consistency of the macaronage. I agree as my first couple of attempts yielded unsuccessful results.


This was the first batch that I made. Piping all looks good but once it entered the oven, the crust cracked and were not smooth. The crust were hollow underneath too and it was very chewy. There are several macaron troubleshooting guide online, however, they made me more confused over what went wrong. Just have to try again and again. 

I made another batch soon after. This time I used a pink liquid food coloring that I bought. Looks nice when piped but the crust browned very quickly, leaving a dark edge rim around the macaron. 


Not wanting to give up, I tried a few more times, baking small batches each time and trying different methods and temperature. Finally, I think I got it right especially the consistency of the macaronage and the oven temperature. I found that the position of the racks plays an important role too. Every oven is different so one will need to find out the ideal temperature and rack position for the recipe. 

Foot is forming on each macaron. Shell is smooth and shiny!

Finally successful - Almond buttercream macaron :)


Thursday, June 28, 2012

Weather

Possibly the record highest temperature in Central Indiana since the 1930s!

Sunday, June 17, 2012

Spaghetti Carbonara

I enjoy cooking spaghetti carbonara especially on days when I am feel lazy and do not want to spend too much time prepping ingredients and washing pots and pans.


Besides, this dish utilizes a few simple ingredients that is often available at home. 

Ingredients (serves 2)

Spaghetti (amount for 2)
2 whole eggs, at room temperature
1/4 cup of grated cheese (I used Parmigiano Reggiano)
black pepper (amount to taste)
1 tbsp cream
Prosciutto (sliced in rough pieces. If using bacon, slice into small pieces and pan fry before adding in step 4.)
Peas, optional (I like to add peas to bring some color to the otherwise pale dish)

Directions

1. Bring a pot of water to boil. Salt it and put in the spaghetti. Cook until al-dente (about 8-10 mins on high heat)
2. While spaghetti is cooking, mix eggs, cheese, black pepper and cream in a bowl. 
3. Strain spaghetti when done. Promptly return it to the pot. Quickly stir in the egg mixture and combine well with spaghetti. The heat from the spaghetti will cook the egg mixture.
4. Add in prosciutto / bacon and lastly peas (heated up in a bowl of water for 30 seconds in the microwave). 

Serve with extra sprinkling of cheese and black pepper. Enjoy!


Friday, June 15, 2012

This week's bento lunches

Prepared 5 bento lunches this week (no pic for Monday as I forgot to take the photo). 
Here they are ... 

Tuesday
- leftover Japanese style potato salad
- red wine beef stew (recipe here)
- sliced french loaf to go with the stew


Wednesday
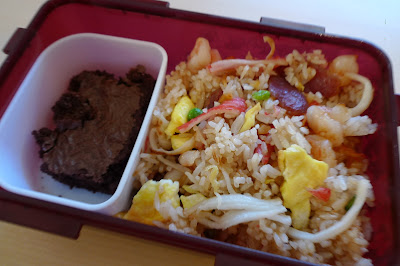
- fried rice with Chinese waxed sausage, imitation crabmeat, salted fish, prawns and eggs
- a small serving of brownie (from weekend's gathering with friends)


Thursday
- Miso-glazed pork on a bed of rice

Recipe
3 palm sized pork fillet
2 tbsp Miso
1 tbsp mirin
1 tbsp ginger juice
1 tbsp sugar


Mix seasoning in a bowl and pour over pork fillet. Let it sit in the fridge for 2 hours (i left mine overnight). To cook, pan fry lightly on both sides. 

- ABC soup (from yesterday's dinner :)
- two small slices of walnut butter cake


Friday
- Kraft mac & cheese (got feedback that the pasta hardened and was dry by lunchtime. Point noted)
- Ikea meatballs and some Horseradish cheese cubes we bought during our recent trip to Vermont


Love the Panda pick!

Wednesday, June 13, 2012

Bento lunches

I started my interest in bento boxes and packing lunches in 2007 when we were living in Australia. After returning to Singapore, I stopped bento-ing except the occasional sandwiches that I bring to work for breakfast.

Last week, I started to pack bento lunches for my other half again as he started internship at a local company. This will last for 8 weeks, so I get to 'play' with my bento boxes again!

Here's are some bentos that I prepared last week.

In the lock & lock box:
- Egg mayo sandwiches on white bread, sliced into halves for easy eating
- Mini cheddar sausages with ketchup for dipping in the blue elephant container
- 2 clementines for dessert


In the Zojirushi Ms Bento thermal jar:
- bottom layer holds spaghetti with tomato cream sauce 
- top layer holds Japanese style potato salad and some cherries. 


Stay tuned for more bento lunches coming your way!

Thursday, April 26, 2012

Hainanese Pork Chops

Was chatting over FaceTime with my mom when the topic of Pork Chops came up. She gave me instructions on how to prepare this dish and I decided to cook this for our dinner tonight.

It tasted really delicious! I'll definitely be cooking it again soon!


Ingredients (serves 2 big eaters)

4 pieces of thin sliced pork loin (about 1 cm thick)
half yellow sweet onion, cubed
1 tomato, cubed
10pieces of graham cracker, grind into fine crumbs
1 egg, beaten
green peas, amount to your liking
oil, sufficient for deep frying

Seasoning (for pork loin)
a dash of salt and pepper
2 tbsp Worcestershire sauce
1 tbsp soy sauce

Seasoning (for sauce)
6 tbsp ketchup / tomato sauce
2 tbsp oyster sauce
1 tsp sugar
1/2 cup water

Directions


1. Marinate pork loin with seasoning for a minimum of 2 hours.
2. Remove pork loin from fridge about 20mins prior to cooking to allow meat to come to room temperature. This will ensure even cooking.
3. Coat individual pieces of pork with egg followed by cracker crumbs.
4. Deep fry until golden brown. Remove and set aside.
5. When cool, slice into pieces each about 2cm in width.
6. In a fry pan coated with oil, saute onions till aromatic then add in tomato cubes and green peas. Continue to saute for another 1-2mins. Lastly, add in the seasoning for the sauce and bring to a boil.
7. Pour over sliced pork loin and serve.


Saturday, March 3, 2012

Colors of Spring

The weather is beginning to warm up and I think Spring is officially here (although we still have random cold days, like today - max of 7 deg C)

Took some photos recently that reminded me of Spring, where flowers start to bloom and you can hear birds chirping again.


Mix fruits salad - Mandarins, Pineapples, Strawberries and Blueberries

Artichoke
   

Tuesday, February 28, 2012

Hainanese Chicken Rice

Chicken rice is so common in Singapore that I hardly have a craving for it back home. However, now that we are thousands of miles from home, the food that we often take for granted comes into our mind once in a while.
Drizzle with soya sauce / sesame oil before eating

Steep chicken in hot water and immerse in ice bath after cooking


Here's how I do it (the easy way):

Ingredients
1 whole chicken (about 4lb)
thumb size garlic, bruised
stalks of spring onion (optional, I didn't use it as I don't have it at home)
salt

Method

1. Sprinkle salt generously over chicken and give it a good scrub. This removes any impurities and makes the chicken looks nice and clean. Rinse well. 
2. Fill a pot with water just enough to cover the chicken. Bring it to boil.
3. Meanwhile, season the chicken with salt all over. Remember to season the cavity of the chicken too. After this is done, insert the bruised ginger and spring onion bundle into the cavity. 
4. Insert the chicken (breast side down) gently into the water when it has come to a boil. Immediately lower the heat to a very gentle simmer. Partially cover the pot. Steep the chicken for 40 - 45 mins. (This helps to maintain the tenderness of the chicken while keeping the skin intact). 
5. To test whether it is cooked, insert a tester (I used the pointed end of a kitchen thermometer) into the thickest part of the chicken away from the bone. The chicken is cooked if clear juices run out. If it's bloody, the chicken is not cooked yet and you have to let it steep for a couple more mins. 
6. Remove chicken from pot when it is cooked and immerse it gently into an ice bath (ice and cold water in a deep basin). Let it sit for 15mins. I usually leave it in the ice bath (refreshing it with cold tap water) till I'm ready to eat it. 
7. Chop it up, serve with chilled cucumbers and enjoy!

Usually 1 whole chicken is too much for us so I'll often keep some of the breast meat aside to prepare a simple shredded chicken porridge for lunch the next day using the chicken broth from steeping of the chicken. 

Monday, February 27, 2012

Simple red wine beef stew

Here's a simple red wine beef stew that I cooked over the weekend. We enjoy having stew most when it's cold & windy outside. This is my own recipe adapted from several Beef Bourguignon recipes that I found online.


Ingredients

1.5lb stewing beef, cut into bite size cubes
1 large onion, diced
2 celery ribs, cut into bite size
2 carrots, cut into bite size
1 tbsp flour plus extra for dusting
1.5 cup of red wine
2 cups beef broth
1.5 tsp sugar
1 can diced tomato
1 tbsp tomato paste
2 tbsp worcestershire sauce
2 bay leaves
1/2 tsp of dried thyme
salt & black pepper 

Method
1. Heat up oven to 160 deg C.
2. Use a paper towel to wipe off any water/moisture on beef. Sprinkle with salt and pepper and mix thoroughly. Dust with flour.
3. Heat 1 tbsp of oil in an oven proof pot and brown beef on all sides. Remove.
4. Saute onion in the same pot. Add a little bit of oil if it is not enough. When onion has turned translucent, add in carrot and celery. Cook for 2 mins.
5. Add in red wine. Use a wooden spatula to scrape off the browned bits at the bottom of the pot. The wine will start to bubble now.
6. Add in all the browned pieces of beef into the pot. Add in beef broth. The level of the liquid should barely cover the meat.
7. Add in diced tomato, bay leaves, worcestershire sauce and sugar. Mix well. Add salt and pepper to taste. I usually do not add anymore salt as the beef will give out more flavor during the cooking process.
8. Bring contents of the pot to a boil, then simmer for about 10mins. Give the contents a stir halfway through the simmering to make sure that the beef / vegetables are not stuck to the bottom of the pot.
9. After 10mins of simmering, turn off the heat and put the pot into the pre-heated oven to cook for 2.5 hours. Check every hour to make sure that there is sufficient liquid in the pot. Top up with beef broth if necessary.
10. The beef should be very tender at the end of the cooking time. Remove from oven to the stove top and thicken the gravy with flour.

This goes very well with mashed potato (our favorite way of eating this stew), pasta or bread. I usually cook a large batch of this with enough for lunch the next day. The flavor is more intense the next day and I enjoy having it more as leftovers :)

Monday, February 6, 2012

Kimbap

It's been a while since I last made kimbap. Hence, I decided to make it for lunch today as I still have some radish and half a cucumber to use up. 

I was really pleased with the way it turned out today. I think the color of the veggies goes well together. In addition, I finally figured out how to make the individual pieces look neat & compact. The trick is to spread a thin layer of rice on the laver so there is a right amount of rice vs ingredients. 

 Ingredients arranged neatly in rows about 2inches from bottom
7 rolls of kimbap from 2 cups of cooked rice


Kimbap with eggs, cucumber, carrots and radish. Delicious!

Saturday, February 4, 2012

Lock & Lock goodies!

My recent purchases from Lock & Lock finally arrived today. All four items were purchased at 50% off. Lock & Lock is usually quite expensive back home in Singapore. I'm fortunate that there are frequent promotions for it here in the States.

I've been looking forward to receive the cupcake holder and tea bottle with strainer. The cupcake holder can double up as a snack tray too and now we will not need to use aluminum trays for transporting snacks.


Just brewed some green tea in my new bottle. It is indeed very useful and convenient.


Wednesday, February 1, 2012

Guacamole

The Super Bowl is on Sunday February 5. It is one of the biggest sports event in America and people usually have parties on that day where family and friends gather to watch football and eat.

Amongst the party food, guacamole (eaten with corn chips or tortillas) is one dish (snack?) that will most likely be served. Maybe that is the reason why I see so many avocados in the supermarket lately.

I bought some avocados yesterday as they looked really fresh and ripe for eating. When choosing avocados, check for ripeness by gently pressing into it. If it's hard, then it's not ready to be consumed. If it's too soft, it is over-ripe and will not taste good. Look for one that gives in a little when it is lightly pressed. Traditionally, raw onions and cilantro are added in guacamole. However, I left them out as I do not like its taste.


 Guacamole
3 ripe avocados
1 jalapeno pepper, remove seeds and diced
1 tomato, diced (I used about half a box of cherry tomatoes)
1 lime
sea salt

Method
1. Cut avocados in halves, remove seeds and mash them up in a large bowl.
2. Season with sea salt (to taste).
3. Squeeze juice from lime over the mixture.
4. Add diced tomato and jalapeno and mix well.

Serve with corn chips or tortillas.

*On a side note, I would like to recommend the green kitchen utensil you see in the photos above. It is an avocado slicer/scoop/cutter. This is how it looks like.


This is the first time I am using it ever since picking it up at the supermarket when it was on 50% off. I paid about $2 for it. It is very useful. It can be used to cut an avocado into half by using the serrated edge. Then use it to remove the seed and the rounded part to scoop out the avocado from its skin. It can also be used to mash the avocados. Now I can cut, scoop and slice avocados using one utensil! 

Flowers

Spring is almost here and flowers are starting to make their reappearances.

These are two of my favourite flowers. 


Pink Gerberas


Fresh Tulips

Monday, January 30, 2012

Spinach Casserole

Casserole or bake is very popular here in America. During morning tea at church, casseroles often make their appearances on the food line. The two variations that I usually see are potato casserole and spinach casserole.

Taken from Wikipedia
casserole, from the French for "saucepan",[1] is a large, deep dish used both in the oven and as a serving vessel. The word casserole is also used for the food cooked and served in such a vessel, with the cookware itself called a casserole dish orcasserole pan. In British English, this type of dish is frequently also called a bake, coinciding with the cooking technique used to cook casseroles.


The spinach casserole is something like a quiche, however without the pastry crust. I like to think of it as more of a frittata, an egg-based dish with ingredients thrown in, cooked on the stove and finished off in the oven by baking or grilling.

The casserole that I made was fuss free and convenient. You can throw everything together in under 5mins and the rest of the work is done by the oven.


Spinach Casserole
1 box (6 oz) frozen spinach, thawed 
4 eggs
1 cup milk
1/4 cup all-purpose flour
1 pkt (6 oz) shredded cheese (I used Swiss cheese)
1 tsp salt
a dash of black pepper
a dash of worcestershire sauce


Method
1. Pre-heat oven to 176 deg C / 350F.
2. Squeeze off excess moisture from spinach with your hands.
3. In a bowl, beat eggs and add in milk, flour, black pepper, salt & worcestershire sauce. Mix well.
4. Add in half packet of the shredded cheese. Mix well.
5. Add in spinach. Mix well.
6. Pour mixture into an oven-proof baking dish. Top with remaining shredded cheese.
7. Bake in the oven for 45mins and turn to grill/broil mode in the last 5mins.
8. Test with skewer or knife to check for doneness. If it comes out clean, it is ready!

Sunday, January 29, 2012

Spiral Curry Puff

Curry puff is one of my favourite snack back home in Singapore. There is an Old Chang Kee stall opposite my office and I will often buy a curry puff on my way back after lunch, just in case I get hungry in the mid-afternoon.

Recently, my cravings got the better of me and I started searching online for curry puff recipes, especially those with a spiral pastry shell, those similar to A1 style.

This was the result with the first recipe that I tried. It was a failure as the pastry was hard and the fillings were too dry. I think it had to do with the fact that I fried the puffs for too long. Or it could be the way I worked the water dough as I could feel that the dough was a little hard when I rolled it out (the recipe asked for an egg to be used for the water dough and I'm not sure if this was another contributing factor).


I tried another recipe the next day as I had leftover fillings and this time round, I managed to get the texture and taste that I wanted. The recipe's a keeper! This recipe yields 30pcs of small curry puffs.

Water Dough
400gm all-purpose flour (sifted)
225ml water
1/4 tsp salt
2 tablespoon unsalted butter

- Add salt to the flour and blend in the butter with a pastry blender.
- Add water gradually and mix well. Work till the dough forms into a ball and is soft, pliable and non-sticky.
- Divide dough into two balls and wrap individually with cling wrap and leave aside. Work on oil dough now.

Oil Dough
200gm all-purpose flour (sifted)
150gm unsalted butter (cubed)
- Blend butter into flour with pastry blender until it resembles coarse sand.
- Form dough into a ball and divide into two.

Assembling the pastry


- Take one ball of the water dough and flatten it slightly with hands. Place a ball of oil dough on it and wrap it up.
- Roll out the dough into an oblong shape on a floured surface.
- Make 2 folds on the dough, one going on top of the other. Roll it out again.
- Roll up the dough into swiss roll style.
- Cut dough into 15 round pieces of approximately 1cm thick.
- Roll each piece into a circular shape and place filling in the middle. Try not to over fill as it may break the pastry.
- Repeat the steps above with the remaining water and oil dough.


- Fold over and make pleats to seal.

Finished product! Deep fry until it starts to turn light brown. Drain on paper towel to remove excess oil.

I made a tray of 30 curry puffs for deep frying next week. Hope they will turn out well!


Here's a video of me pleating the curry puffs.

Myulchi Bokkeum - Korean Banchan

The packet of mini anchovies have been sitting in my fridge for almost 5 months and was hardly used.

So today, I decided to prepare myulchi bokkeum, a side dish (banchan) that is commonly served in most Korean restaurants.

This was very easy and quick to prepare. I followed the recipe from here.

We had this with rice and seaweed and it was delicious.


Thursday, January 12, 2012

Winter Holiday 2011


It has been a while since I last blogged. We've been doing lots of traveling, taking all opportunities to visit places in the US.

During the recent winter break, we managed to squeeze in two separate trips in the short span of 3 weeks. The first one was a road trip to Kentucky, Tennessee and St Louis (which I will try to cover in a separate post) and just before the New Year, we visited Niagara Falls, New York City and made a day trip to Washington D.C.

I shall not give boring details of what we ate, where we visited etc. Instead, I would like to share some photos that were taken during the trip. Enjoy!

After spending two nights in Niagara Falls, we made our way via the Amtrak to NYC on New Year's Eve. What is New Year's Eve in NYC without participating in the famous ball drop in Times Square? We braved the crowd and the cold and managed to make our way there. We stood for 6 solid hours with more than 1 million spectators, waiting for the clock to strike 12!
We visited many attractions and ate a lot in NYC! These were just the tip of the iceberg of what we ate, the famous Katz deli Pastrami Sandwich & Totto Ramen which we queued for almost 2hrs, starting at 5pm.


While in NYC, we also did a side trip to Washington D.C We took a package with Viator for a one-day trip to the capital of USA.

It was indeed a very enjoyable and memorable trip!


Related Posts Plugin for WordPress, Blogger...